How to secure solar panels on a tiled roof? The answer begins below the panels, where roof structure, fixings, and weather protection work together. A successful installation is not simply a matter of attaching rails to visible tiles. Installers must locate sound rafters, lift tiles carefully, and use certified hooks or brackets designed for the specific roof profile. The wrong fixing can crack tiles, loosen under wind uplift, or create a slow leak around the mounting point.
Solar installer and educator Sean White emphasizes, “A safe installation starts with a safe roof.” That principle matters on older homes, where timber may be weakened, tiles may have hidden fractures, and previous repairs may be poorly documented. A qualified installer should inspect the roof before ordering equipment. They should also check local wind conditions, array layout, drainage paths, and manufacturer instructions.
Small details decide long-term performance. Flashing must direct water around penetrations. Rails should remain aligned, without forcing uneven tiles into place. Stainless-steel hardware and correctly torqued bolts help resist corrosion and movement. After installation, the roof should be checked from ground level and beneath the tiles, where practical.
Still, no method fits every tiled roof. That is the part homeowners sometimes underestimate. A neat-looking array can conceal weak attachment points. This guide explores practical fixing methods, common mistakes, inspection steps, and questions to ask before work begins. The goal is not merely keeping panels in place. It is protecting the roof, the occupants, and the investment through changing weather.
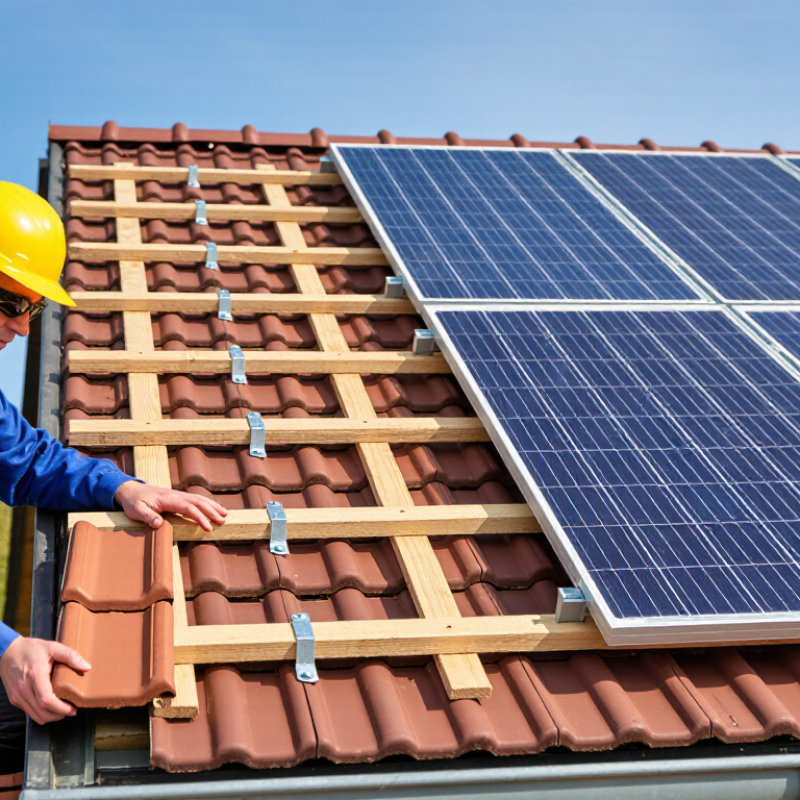
Before choosing mounting hardware, assess the tiled roof as a structural system, not just a surface. A qualified installer should inspect rafters, battens, underlayment, tile condition, and signs of movement. Cracked tiles, sagging lines, or loose ridge caps require attention before panel placement. An attic inspection can reveal undersized rafters or moisture around previous penetrations. Do not guess.
Solar panels add steady weight and wind forces, especially near roof edges and exposed ridges. The mounting layout should transfer loads into sound rafters while avoiding weak tile spans. Where possible, attachments should sit over verified framing and use carefully sealed flashing. Tile hooks or replacement tiles may reduce cutting, but their suitability depends on tile profile and roof pitch. Installers often see neat layouts fail when tile lines replace structural measurements. That detail is easy to miss.
Placement also affects energy yield and future maintenance. Keep panels clear of chimneys, valleys, vents, and heavy afternoon shadows. Leave practical access paths for inspection and tile replacement. A compact array is not always the best array. Roof age matters. Installing panels over brittle tiles can increase breakage during routine work. Record measurements, wind exposure, local loading requirements, and drainage before drilling. Even experienced teams can overlook one awkward vent or hidden rafter. A second site review can catch it.
Securing solar panels on a tiled roof starts with compatible mounting hardware, not the panels themselves. Tile shape, roof pitch, rafter spacing, and local wind loads all affect the mounting design. A hook should sit over the supporting rafter, while its base must clear the tile without creating pressure points. If the hook presses against a brittle tile, cracks may appear months later.
Stainless steel or corrosion-resistant aluminum components usually suit exposed roof conditions. Adjustable tile hooks can help when tile profiles vary, but adjustment should never replace accurate measurement. Rails must remain level, and fasteners should match the roof structure rather than only the tile surface. Proper flashing is essential around every roof penetration. It directs rainwater away from the fixing point and reduces the risk of hidden leaks.
During an inspection, an installer should lift selected tiles carefully and check the underlayment, rafters, and existing damage. Keep spare tiles nearby. Breakage happens, even with careful work. I have seen systems fail because installers chose universal hardware without checking the tile profile. That shortcut looked efficient but caused uneven rails and cracked tiles. A qualified professional should verify structural capacity, drainage, grounding, and local installation requirements before work begins. The best hardware is not always the most adjustable option. It is the option that fits the roof precisely and transfers panel loads safely into the structure.
Preparing roof tiles properly is the foundation of a secure solar panel installation. Begin by inspecting the roof from the ground and inside the attic. Look for cracked tiles, loose battens, water stains, and sagging timber. Replace damaged tiles before lifting any mounting hardware. Small defects can become expensive leaks.
Experienced installers usually mark each mounting point over sound rafters, not unsupported tile sections. Carefully remove the selected tiles, then expose enough roof structure to verify the fixing position. Use corrosion-resistant screws designed for structural timber, with suitable flashing around every penetration. The flashing must sit beneath the upper tile and over the lower tile, guiding rainwater away from the opening. Never force a tile against a bracket. It may appear stable, but pressure can create a hidden fracture.
Allow room for tile movement and thermal expansion. Keep mounting rails aligned, while checking that they do not bear directly on fragile tile edges. A torque-controlled tool helps prevent loose or over-tightened fixings. This detail is easy to overlook. After installation, inspect the roof from several angles and test each attachment point for movement. If a tile breaks during the work, replace it rather than hiding the damage. Even careful planning has limits, especially on older roofs, so a qualified professional should confirm structural capacity, weather sealing, and compliance with local requirements.
| Installation Area | Recommended Method | Technical Guidance | Quality and Safety Check |
|---|---|---|---|
| Roof Condition | Inspect the roof before any solar work begins. | Check the roof covering, battens, rafters, underlayment, flashing, and signs of moisture or movement. Replace damaged tiles before installing the array. | Do not install over active leaks, deteriorated timber, cracked structural members, or tiles that cannot be safely supported. |
| Tile Preparation | Remove or lift only the tiles required for each mounting point. | Handle tiles carefully and keep replacement tiles available. Avoid cutting tiles where possible; if cutting is necessary, use a neat, controlled notch that does not interfere with the hook or flashing. | Tiles should lie flat after installation, with no rocking, sharp edges, or concentrated pressure against the mounting hardware. |
| Mounting-Point Location | Fix roof hooks or brackets into suitable structural members. | Locate rafters or other approved structural supports rather than relying on tiles alone. Confirm the position from the roof structure and follow the mounting system's approved layout. | Each fixing point must have adequate timber or structural support and must not be placed only in a tile, unsupported batten, or weak substrate. |
| Roof Hooks | Use hooks designed for the specific tile profile and roof construction. | The hook should clear the tile without forcing it upward. Where permitted by the installation instructions, adjust the hook or use an approved tile replacement plate to maintain even tile support. | The hook must not bear directly on a fragile tile edge or create a point load that could cause cracking. |
| Fasteners | Use corrosion-resistant structural fasteners of the correct size and type. | Fasteners should be suitable for the roof environment and driven into the approved structural member. Do not substitute general-purpose screws for structural roofing fixings. | Verify fastener quantity, diameter, embedment, spacing, and edge distances against the engineered design and local requirements. |
| Waterproofing | Preserve the roof's water-shedding layers around every penetration. | Keep underlayment intact where possible. Use the mounting system's approved flashing or sealing detail; flashing should direct water over the tile course below rather than behind the underlayment. | Inspect for exposed holes, lifted underlayment, damaged flashing, blocked drainage paths, or sealant used as the only waterproofing measure. |
| Rails and Clamps | Attach rails to the approved hooks or brackets, then secure modules with compatible clamps. | Keep rail spans, cantilevers, splice locations, clamp zones, and end overhangs within the mounting system's published limits and the structural design. | Rails should be aligned and fully tightened. Clamps must sit in the permitted module clamping zones without contacting glass or frame components incorrectly. |
| Wind and Snow Loads | Design the array for the site's environmental loads. | Consider local wind speed, exposure, roof height, roof pitch, snow load where applicable, array size, and the building's structural condition. Edge and corner zones often experience higher wind effects. | Use calculations or tables accepted by the applicable building code. Do not determine mounting-point spacing from panel size alone. |
| Tile Replacement | Replace modified or damaged tiles with sound tiles that fit the roof course. | Maintain the original overlap and drainage path. A replacement plate or purpose-made flashing detail may be needed where a hook interrupts the tile profile. | Confirm that tiles do not press against the bracket and that water can flow freely down the roof without being diverted into the fixing area. |
| Electrical Bonding | Provide the required bonding and grounding connections for the mounting system. | Follow the applicable electrical code and the mounting-system instructions. Use approved bonding hardware and ensure continuity across rails and required metal components. | Test continuity and document the result where required. Electrical work should be completed or verified by a qualified professional. |
| Cable Management | Secure cables so they do not rest on tiles or hang below the modules. | Use UV-resistant clips or approved cable supports. Maintain bend-radius requirements, keep connectors away from standing water, and avoid sharp edges or pinch points. | Cables should be protected from abrasion, heat accumulation, wind movement, and contact with the roof covering. |
| Final Inspection | Complete a mechanical, waterproofing, and electrical inspection before handover. | Check fastener torque where specified, rail alignment, clamp position, tile condition, flashing, cable routing, grounding, and clearances from roof edges and obstructions. | Record photographs, inspection results, product instructions, structural calculations where applicable, and any required permits or approvals. |
| Important: Mounting-point spacing, fastener specifications, structural capacity, electrical requirements, and roof-edge clearances must be confirmed using the applicable building and electrical codes, the roof structure, and the approved installation instructions. Work on a tiled roof should be performed by trained personnel using appropriate fall protection. | |||
Securing solar panels on a tiled roof begins with careful roof inspection. Check cracked tiles, loose battens, water stains, and the condition of the rafters. A weak roof should not carry a new array. Have a qualified installer confirm the structure, wind exposure, and local requirements before drilling.
Rails need firm attachment to rafters, not merely roof tiles or thin battens. Installers usually remove tiles around each fixing point, then place corrosion-resistant roof hooks or approved brackets over the rafters. Flashing should sit beneath the upper tile and above the lower tile, directing rain around the penetration. Keep the hook height consistent, or the rail may twist under load. It sounds minor. It is not.
Position the rails according to the panel layout and the roof’s strongest framing lines. Leave enough clearance around panel edges for clamps, thermal movement, and maintenance access. Panels should avoid valleys, ridges, skylights, and areas where falling tiles could cause damage. Tighten every connection to the specified torque, then check rail alignment with a straightedge. I have seen rushed layouts create uneven gaps and stressed frames. Rechecking measurements before lifting the panels is slower, but it prevents expensive corrections. Replace every removed tile carefully, and inspect the roof after the first heavy rain.
A secure tiled-roof installation begins with waterproofing, not panel placement. Professional installers should lift tiles carefully and attach mounting points to rafters or engineered roof members. The tile should not carry the main structural load. Flashing must direct water around each penetration, while compatible seals provide secondary protection. Sealant alone is not a complete waterproofing system. That shortcut creates a weakness.
Wind stability also requires documented calculations. The U.S. Department of Energy recommends designing rooftop systems for local wind, snow, and roof conditions. Installers should check every clamp, rail, and fastener against the project’s structural requirements. A loose rail can cause movement, cracked tiles, or progressive water entry. The array may look stable from the ground. That proves very little.
Long-term security depends on inspection quality. Before handover, installers should photograph flashing, confirm fastener torque, and perform controlled water testing. They should also leave replacement tiles and maintenance access. NREL’s Photovoltaic Degradation Rates report found a median module degradation rate near 0.5% annually across analyzed systems. Panels may operate for decades, so the roof attachments must last just as long. I would still schedule checks after severe storms. No inspection method is perfect. Tiles can shift quietly, and early defects are easier to repair than hidden moisture damage.
Tile shape, roof pitch, rafter spacing, and wind exposure affect the mounting design. Universal hardware may create uneven rails or cracked tiles. Precise measurements matter.
Roof hooks should sit over structural rafters or engineered roof members. Tiles should not carry the main panel load. Thin battens alone may be insufficient.
The hook base should clear each tile without pressure points. Installers should lift tiles carefully and keep spare tiles nearby. Breakage still happens.
Stainless steel and corrosion-resistant aluminum usually handle outdoor exposure well. Fasteners must match the roof structure, not only the tile surface. Compatibility matters more than appearance.
Flashing directs rainwater around each roof penetration. It should sit beneath the upper tile and above the lower tile. Sealant alone is not enough.
Rails should follow strong framing lines and remain level. Installers should leave space for clamps, thermal movement, and maintenance access. Check alignment with a straightedge.
Panels should avoid valleys, ridges, skylights, and vulnerable tile areas. Falling or shifting tiles could damage the array. Roof layout needs careful thought.
Confirm fastener torque, inspect every clamp, and photograph the flashing before handover. Controlled water testing can reveal weak drainage. Recheck the roof after severe storms.
A qualified professional should inspect cracked tiles, loose battens, water stains, rafters, and underlayment. They should verify structural capacity and local requirements. A weak roof should not carry new panels.
Inspect the system after severe storms and watch for shifted tiles, loose rails, or moisture marks. Panels may last for decades. Hidden defects are easy to underestimate.
How to secure solar panels on a tiled roof? Start by assessing the roof’s age, condition, framing, slope, and load capacity, then plan panel placement to maximize sunlight while avoiding weak or damaged tiles. Select mounting hardware designed for tiled roofs, ensuring the fixings are compatible with the roof structure and able to withstand wind and weather exposure.
Before installation, carefully lift or remove only the necessary tiles and prepare secure mounting points that connect to the supporting structure rather than relying on the tiles alone. Install the roof attachments, replace or adjust tiles neatly, and use suitable waterproofing measures around every penetration. Next, attach the rails, check their alignment, and position the panels evenly with safe clearances. Finally, inspect all fasteners, cable routes, seals, and support points to confirm stability, drainage, and long-term protection against movement, leaks, and weather-related stress.

Soltrux Solar